Posts

Showing posts from July, 2018

Dirndl Top

Image
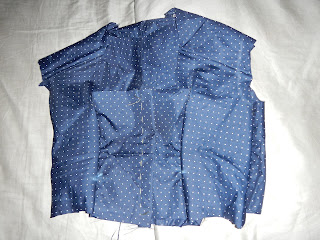
Dirndl Top Made From Umbrellas You read that right.  I am making a dirndl top out of umbrella fabric.  What?  All the cool kids are doing it!  I heard that little girl with the fashion blog who dyed her hair gray made one.  No, not really.  Anyway, I'm a hoarder, and every year when I see inside-out umbrellas lying in the street, I think, "I bet I could do something with that."  So I cut the cloth off of two busted umbrellas I found, washed it, and here we are. I used this pattern: https://www.simplicity.com/burda-style-pattern-7326-dirndl-dress/B7326.html#q=dirndl&prefn1=contentType&prefv1=simplicity-tools-supplies&start=8 Step 1: Go through all the papers that come with the  pattern and cut out the pieces in your size that make up the top. Step 2:  Baste all the pieces together. Step 3:  Look at the pieces and realize they're all backwards, and take them all apart and baste them together the right way. I mean, I could blame the terribly G

Low-Effort Winter Soldier Arm

Image
When You Don't Care Enough To Make The Very Best I mean sure, you could make a big cling wrap and duct tape arm, but this is so much easier!  It is going to have some wrinkles in it, but it's lighter weight, allows your arm to move more, and breathes better. This is what you get if you order a fat quarter of the Sport Lycra "Upper Arm Metal", and the Sport Lycra "Lower Arm Metal". So with this amount, you can fit a variety of arm sizes.  I made a division at the elbow joint, with the upper arm being the usual sleeve shape for a shirt.  The lower arm I made longer in the elbow, since I don't exactly walk around with my arms hanging straight down; they always have a little bend to them. I can't give you an exact pattern for your arm, it's just a matter of taking it in enough that the arm doesn't have too many wrinkles from being too baggy, but also doesn't have wrinkles from being too tight. I also made a thumb loop so

40's Style Trousers

Image
Or, Why to Make a Muslin So if you're planning to use expensive cloth, you want to make a muslin first.  That white thing is the pants pattern made out of cheap, muslin cloth so that it can be adjusted until it's exactly right, and then the real pants can be made out of the gray cloth underneath. Oddly enough, not everyone is exactly the size of the pattern.  So where you don't line up with the pattern, you fix the muslin, thus giving you a new and perfectly accurate model.  For example, after I cut the muslin for this, I tried the muslin on.  I will spare you the sight of my gut, but the pants fit somewhat like the pencil drawing on the right, and not like the lady in the picture. So I measured the amount that the pattern did not cover, 3 inches, and then added that amount, divided, to the new pattern. Also, this pattern is great.  It's printed up on real paper, not tissue paper, and has exceedingly clear instructions.  Lots of the commercially-produced pat

Foldy WWII Hat Part II

Image
I Found My Iron Alright, so I traced out a top for the hat, just a long pointy ovoid.  If you go with the Naval regulation size from the link on the previous page, the top should only be 1.5 inches across.  Mine was wider than that, but since I was sticking to the WWII style of sewing the inside of the top together so it doesn't really open up at all, it doesn't make much difference. After scooching the brim of the hat up and down until it looked about right, I sewed a muslin hatband in.  It was just a strip of muslin long enough to go around the inside of the hat, and with a finished width of about 1 inch. Then I ironed the hat flat with an old timey non-steam iron, and then sewed the top of the hat shut about 1/4 inch in from the top.  The pins are 1.25 inches up from the bottom edge of the hat, and they are an Antarctica medal and Women's Rights National Historical Park.  It was the most accurate pins I could find. Anyway, do this, and you will look exact

Foldy WWII Hat Part I

Image
Ah, to be a hat upon that head! Garrison Cap Yeah, I would totally make a believable WWII vet!  But I decided to make a garrison cap.  Mine is muslin, since I don't have a lot of olive drab wool lying around the house.  So first, I made some piping.  They didn't all have have piping, but an off-white muslin hat with no piping will look like nothing. This is a pretty good tutorial on how to make piping, with advice on how to dial it in when you don't do it perfectly on the first try. Here   is a pretty sweet website with actual, historical garrison caps, and zoomable pictures of the insides, so you can see the construction, at least partially. My head measurement is 22.5 inches, so I made what I will refer to as the "brim" that length, plus six inches on each side to account for the overlap in front.  Here's the two pieces of the brim and the piping before putting the string in the middle.  I cut two brims. I used this string, since I wanted

Woman on the Bus Dress

Image
You know the one I mean And if not, why haven't you watched Series 4 of Sherlock yet? No, really, GTFO I don't have a brown leather jacket to go with it yet, but the stripey dress is totally in existence now!  Mwa ha ha ha ha!  https://www.redbubble.com/people/elaphushouse/works/32654980-woman-on-the-bus-dress?p=a-line-dress And if you want to make your own costume this way, first get Photoshop, or GIMP, or something similar.  And the good thing about GIMP GIMP is that it's legitimately and legally free in an above-board manner. So Step 1: learn to use GIMP/Photoshop, etc.  There aren't a huge number of GIMP tutorials on youtube, but it's pretty similar to Photoshop, so you can often get the same results by following Photoshop tutorials.  For this project, I got the A-line dress template from redbubble, opened it up in GIMP, and made another layer for drawing the stripes into.  I watched The Six Thatchers until I found some pretty good shots of the wom

Off-the-shelf Winter Soldier Costume

When You Want It Fast And Not 100% Screen-Accurate I was looking around for reasonable and yet tactical-looking  pants for a Winter Soldier movie-style costume, and lo and behold, there was a pretty reasonable vest , too. I mean, it's kind of expensive, but if you actually bought all the material and sewed it together yourself, that would take up so many man-hours that just buying might be cheaper. Depends if you have lots of time on your hands, and how much you can get the material for. I'm working on a spandex sleeve for the metal arm, but I'm not quite there yet. I should also point out it's super awkward to be mistaken for a school shooter. I was exploring the roof of my school once, and the maintenance man and librarian came out to confront me. Don't end up like this guy: https://www.cbr.com/mistaking-cosplayer-for-gunman-london-police-arrest-winter-soldier/   http://allofthecostumes.blogspot.com/2018/07/low-effort-winter-soldier-arm.html

Makeup for Doctor Strange Villains

Image
All of the Makeup, All of the Time So if you don't already have a lot of makeup lying around the house, here's the sort of thing you should buy for your costume. It doesn't have to be these exact brands. As long as it has a similar effect, it's fine. I wear a lot of makeup when I'm not in costume, since I have a lot of acne scarring . You won't necessarily want all these products, but you should at least get foundation that matches your skin, and the powder, since the latex is not going to look enough like skin without it. Here's what I use for my acne scar coverups, not including eye makeup or blush, since those aren't part of this costume:   So for the costume, you'll need some sparkly purple eyeliner, some black eyeliner, and some other eyeshadow (such as the magenta there) for highlights inside the eye crack region. You'll need a couple shades of gray eyeshadow for the outside burned-looking part of the mask. You&